Detailed Walk-Through
Identify and Save Local Changes
Hopefully the explanations provided thus far are eliciting an aha moment for you. But if not, and you’re otherwise ready to pretend it makes perfect sense for a little longer, let’s go through an example. Later we are going to discuss version branches of your project. For now, all you need to know is we are in a Git initialized project directory and on a version controlled branch called main.

April 22nd, 2025.
Imagine it. You have come up with what might be (and we’re scientists here so let’s not overstate) one of the best color schemes for your data ever. You generate this sweet looking, publication ready plot on the right and save the image as a file called earth_shattering_color_scheme.png. You’re now ready to record this version of your work and share it with the team through the projects GitHub (maybe even the world?), but the changes have not yet been recorded by Git.
RECALL: The same steps are taken if this is your first image file for the plot or if you have tracked previous versions in the .git directory. For our example, it will be the former case.
It is always best practice to start by checking the current status of your version controlled project directory. Say that you generated this image using R in a script called making_cool_plots.R. Running git status in the command-line application will give you something like this:
Command-Line Application
git statusOn branch main
Your branch is up to date with 'origin/main'.
Changes not staged for commit:
(use "git add/rm
(use "git restore
modified: making_cool_plots.R
Untracked files:
(use "git add
earth_shattering_color_scheme.png
These outputs can be a little intimidating, so let’s break them down section-by-section.
The first statement is straight forward. Git is letting us know that we are interacting with it in a version controlled branch called
main.origin/mainrefers to the remote GitHub repository version status of the same branch. “Origin” is an alias for the remote repository location. Equivalently, we can say something like:git@github.com:ysph-dsde/PROJECT-REPOSITORY.git/main.The output is telling us that our local copy of
mainis current with the last-checked status of the remote copy in GitHub. This means we don’t expect that there are local commits not yet reflected in the remote copy.
Your local mirror of origin/main is not guaranteed to be a reflection of the remote repository contents in GitHub. Maybe you share the remote repository with a team who is actively pushing changes to the server, or maybe you changed a README.md, or uploaded a file directly in GitHub since you last synced your local copy. Your local Git is not passively checking the status of the remote repository, so these changes will go undetected until we tell Git to give GitHub a ring for a quick check-in.
It is therefore important to stipulate that origin/main in this context is the last checked status of the remote repository. Sometimes you might run into problems syncing locally committed changes with the remote repository because your local version of origin/main is not up to date.
It is best practice to commit file versions you want to retain to the local .git directory prior to updating your local mirror of origin/main. Later we will discuss the different commands Git uses to pass information from the remote repository to your local mirrored copy.
The next section lists version tracked files stored in the
.gitdirectory that have been changed. Git conveniently provides a few suggestions pointing to next steps:git add/rm/restore. Above, we see the color pallet changes we made in the already version controlled R script have been detected.The “untracked files” section is where files not previously tracked by Git are listed. This means that no previously committed file versions have sufficient similarity with this file to be considered an updated version. Again, Git provides us with a suggestion on the next steps:
git add.As expected, this is where our newly created image file is listed.
Up until this point, file iterations and changes are not recorded in Git’s version history. Before we can store a snapshot of these edits, we need to first add them to the Staged Edits domain. This is done by using the Git command git add in one of two ways:
Explicitly list out each file you want to add to Staged Edits OR
Use the “wild card”,
., to add every file listed under thegit statusoutput.
Command-Line Application
# OPTION #1: List each file
git add "making_cool_plots.R" "earth_shattering_color_scheme.png"

# OPTION #2: Use the wild card "." to add all files
git add .

# View the results of git add.
git statusOn branch main
Your branch is up to date with 'origin/main'.
Changes to be committed:
(use "git restore --staged
modified: making_cool_plots.R
new file: earth_shattering_color_scheme.png
The files have now been moved from the Working Tree to the Staged Edits domain. Notice that this domain is not applying any changes to your project directory. Merely, the stage is a buffer between pending changes and the codified version history of the projects contents. All files promoted for saving get packaged with a message explaining the reason for the version update.
Astute students will notice that staging edits allows the opportunity to group like changes to one commit action. This is a highly advantageous feature that allows you to better control how version changes are recorded in .git. Doing so improves bug troubleshooting and minimizes collateral changes a revert might cause on unrelated parts of the project.
In our example, the two files we have staged are related and the changes we made are objectively flawless, so let’s proceed with committing the changes using git commit. Notice that a message is required with every commit action. It is easiest to add the message inline:
git commit -m "Revelatory message elucidating the hidden secrets of git."Because the message is a mandatory element of a commit action, if you forget to include one Git will always be there to forcibly remind you by opening an editor where you can include one. Thank you so much, Git. If you have not specified the editor Git will use in such circumstances, then it will open up the default vi editor.
To show you how to navigate this outcome, we’re going to forget to include our message.
Command-Line Application
git commit
# Please enter the commit message for your changes. Lines starting
# with '#' will be ignored, and an empty message aborts the commit."
#
# On branch main
# Your branch is ahead of 'origin/main' by 1 commit.
# (use "git push" to publish your local commits)
#
# Changes to be committed:
# modified: making_cool_plots.R
# new file: earth_shattering_color_scheme.png
After entering git commit without a message, Git automatically opens a vi window inside the command-line application. There are specific commands that you will need to use inside this application. You can reference the “Vim Cheat Sheet” by Richard Torruellas for help navigating this space.
To add a message you need to do the following steps:
When the
viwindow first opens it is in “command” mode. Hit eitheraorion your keyboard to enter “insert” mode. When you do this, you might see-- INSERT --at the bottom of the application window.Add in your message in the line at the top of the document. Do NOT include a
#in front, as this will cause your message to be ignored.Hit
Escto exit “insert” mode and reenter “command” mode.Save progress typing
:wand hittingenter. If you are ready to exitvithen you save and exit using:wqinstead. NOTE::w/:wqwill show up at the bottom of the application window.
For our example, after I entered “insert” mode by typing a on the keyboard, I add the message “Outstanding progress on color schemes for density plot fill scaling.” I then save and exit vi by hitting Esc then typing :wq and hitting enter.
Outstanding progress on color schemes for density plot fill scaling.
# Please enter the commit message for your changes. Lines starting
# with '#' will be ignored, and an empty message aborts the commit."
#
# On branch main
# Your branch is ahead of 'origin/main' by 1 commit.
# (use "git push" to publish your local commits)
#
# Changes to be committed:
# modified: making_cool_plots.R
# new file: earth_shattering_color_scheme.png
:wq
[main f9b4cf2] Outstanding progress on color schemes for density plot
fill scaling.
2 files changed, 11 insertions (+), 2 deletions (-)
create mode 100644 earth_shattering_color_scheme.png
Successfully committing our staged edits to the .git directory gives the second output shown. Here, Git is affirming that we have associated the message “Outstanding progress on color schemes for density plot fill scaling.” to the commit hash ID f9b4cf2 in the branch main version history.
It then summarizes the total number of files changed, the total number of line insertions and deletions tallied, and finally it will summarize the file mode. In our example, we have edited two files which have a total of 11 line insertions and deletions between them. The newly created file is associated with directory object type, 100, and attributes the writeable permissions, 644. Together, mode 100644 means earth_shattering_color_scheme.png will be a “regular” file with “non-executable group-writeable” permissions (StackExchange reply by Go Dan).
The commit ID is randomly assigned to any newly created version that has been successfully added to the .git directory. It is the same ID that will show up on GitHub to identify distinct versions and their parents, and it constitutes the first alphanumeric characters used in the 40 character SHA-1 checksum associated with the commit. Executing a git log will show the version history progression for the currently checkout branch, and will provide the entire SHA-1 checksum.
Read more in Atlassian’s Advanced Git log.
We are now well on our way to sharing our updates with the remote repository.
Preamble to Sharing Changes with GitHub
In the series of detailed command-line outputs presented above, there were a few key status cues that indicate the projects version status relative to the remote repository. These cues are summarized in the flow diagram below. Recall that origin/main denote the remote copy of the project branch main housed in GitHub. More accurately, it is the last checked state of origin/main.

Specifically take notice of the cue provided in the second box. Here, Git is telling us that our local copy of the branch main is ahead of the remote copy by one commit. Remember that changes made to files in the Working Tree go unnoticed by Git, and the committed changes are what get evaluated for version control management.
What this prompt means is we have taken one step away from the cohesive version where Git recognized our local copy of the project to be the same as the remote copy. Subsequently committed versions will automatically inherit the history of the parent version along with the newly included modifications in a linear fashion. If we had instead changed three different aspects of the project, and committed these three like changes together in separate commit actions, then this message will say that we are three commits ahead.
Pull Before You Push
Before we update the remote copy of our branch main to reflect our changes with git push, it is good practice to review updates that might have occurred in the remote repository since we last prompted Git to access it. This is done with an action called git pull. There are two possible situations you can run into after executing a git pull at this stage of the process:
No changes have been made to
origin/main, justifying no change to your local copy withgit pull.Changes have been made to
origin/main, requiring reconciliation of the divergent versions.
The first case is straightforward, and so we will only discuss two methods available to reconciling the second case. Consider the diagram below showing an example divergent commit history of the local branch main from its remote copy.
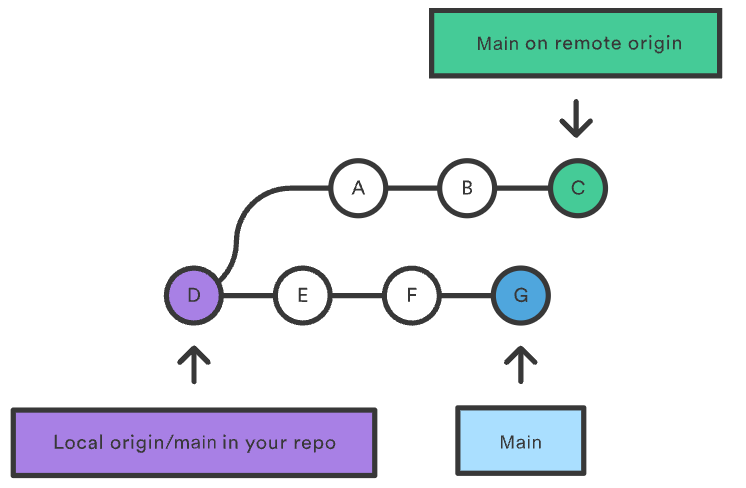
In purple, we have the version of origin/main retained on our local device from which we have been working. This is the version of origin/main that our local Git uses to reference changes made in the same branch, represented in blue with the commits E-F-G. In green are additional changes made directly in GitHub or from another collaborator that have been integrated into origin/main with the commits A-B-C.
There are a great deal of commands associated with Git’s version control framework. It is most helpful to slowly expand your Git vocabulary and tool box by exploring related commands, or commands that specifically address your workflow needs. Below are a couple of good places to start advancing your basic understanding of Git:
git logfacilitates navigating the version history of your project. This command is most often used to understand version differences prior to merging or rebasing, such as following agit fetch. Read more from Atlassian’s Git Tutorial: “Advanced Git log”.- Atlassian’s comment on: Merging vs. Rebasing, specifically the section about the golden rule for rebasing.
In actuality, git pull is two Git actions wrapped into one command: git fetch and one of two integration protocols, git merge or git rebase. git fetch will download the files and version history currently reflected in the remote copy of origin/main as a temporary branch by the same name on your local device (read more from Atlassian’s Git Tutorial: Git fetch). In the diagrams below, we see the different ways git merge and git rebase will interpret a coalescence of the two.
Merge

Rebase
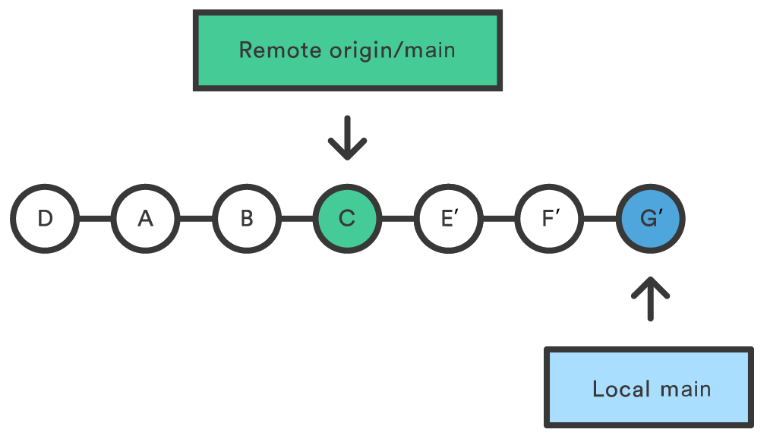
git merge conducts a three way commit: two inherited from the heads of each branch (versions C and G) and a third for the merge action that creates a new version that integrates changes relfected in C and G, here called H. git rebase will realign the commit histories of the two branches relative to one another by pasting the series of one branch at the head of the other. Doing this necessitates redefining the parent commit history for the newly appended commit series, from which we get the name “rebasing”. The figure above shows rebasing the main branch commits with origin/main A-B-C, creating the rebased versions of those commits, E’-F’-G’.
Command-Line Application
# -----------
# Pull in One Command

# OPTION #1: Integrate the fetched copy of "origin/main" into "main" with merge.
git pull                        # Assuming the default protocol is a merge

# OPTION #2: Rebases "main" with the new parent history reflected in "origin/main".
git pull --rebase               # Override the default merge to do a rebase
Command-Line Application
# -----------
# Two-Step Pull

# Download branch main from the remote repository, origin.
git fetch origin main

# Inspect changes.
git branch -a    # Lists all local branches, including remote copies
git status       # Summary of status differences between the two versions
git diff main    # Summary of code differences between the two versions

# OPTION #1: Integrate the fetched copy of "origin/main" into "main" with merge.
git merge FETCH_HEAD

# OPTION #2: Rebases "main" with the new parent history reflected in "origin/main".
git rebase FETCH_HEAD
If you are new to Git and uncomfortable discerning when to use one option over the other, it is best to employ a git merge. Fortunately, this is the default protocol used by git pull! Regardless of your comfort level with Git, it is important to understand the different protocols and that there are times when one is better to use over the other.
The complete and current copy of your project is typically stored in the remote repository in the branch origin/main, where the development team or the public can access it. In development workflows, the publicly facing copy is treated as the current baseline on which further developments needs to based one.
If you decide to try git rebase, it is best practice to never rebase the remote copy of origin/main for this reason. Instead, only rebase your local branches with the remote version.
In general, use git merge when:
- you are new to Git or not comfortable using a rebase.
- you have longer periods over which you develop features that rarely get merged into the main workflow.
- you use
git mergeall the time for no reason, but also happen to be a wiz at usinggit log(and can possibly visualize in the fourth dimension), making sorting through the pile of commits a trivial task.
Use git rebase when:
- you want to avoid over complicating the version history by keeping it linear.
- you want to update your base with the teams current base reference in GitHub.
- you are not adding many version tracked edits to a branch before coalescing them again.
- you are a meticulous and neat Git user, frequently committing your work in well messaged packages, limiting the possibility of wreaking havoc on the commit history with a rebase.
Notwithstanding conflicts between the branches, git merge is considered to be a non-destructive, but non-linear, way of integrating two version histories. git rebase, on the other hand, maintains a linear version history but can be destructive to the commit history or create complicated divergences that are harder to bring together if used improperly.
When choosing your coalescing method, consider the position of your branch relative to the completely integrated copy of the project and the number of version tracked commits that differ between the branches.
Time to Share with the World
Whew! We’ve covered quite a bit of ground. To summarize, we have grouped similar project edits in one commit with a message explaining our work, advancing our projects .git directory one step forward. After committing all the changes in our repository, we prompted Git to check the status of origin/main stored in GitHub, and discussed two different coalescing strategies offered by git pull: git merge and git rebase.
We are now prepared to update the remote repository with git push. Recall the figure above that summarizes key status cues:
Pushing our changes to GitHub will cause the commit HEAD of our local copy of branch main to merge with the same branch stored in the remote repository. HEAD is a term describing the latest commits available in the .git directory for that checked-out branch. Sometimes, you might see it referred to as main --> main instead.
Command-Line Application
git push origin mainEnumerating objects: 14, done.
Counting objects: 100% (14/14), done.
Delta compression using up to 8 threads
Compressing objects: 100% (9/9), done.
Writing objects: 100% (9/9), 90.13 KiB | 22.53 MiB/s, done.
Total 9 (delta 5), reused 0 (delta 0), pack-reused 0 (from 0)
remote: Resolving deltas: 100% (5/5), completed with 5 local objects.
To github.com:ysph-dsde/PROJECT-REPOSITORY.git
7d1b339..f9b4cf2 main -> main
The git push output will look something like this. It indicates that our upload was completed successfully, and supplies some details about the update. For example, it gives the previously committed versions ID, which is now updated from 7d1b339 to f9b4cf2, the remote repository location, and the size of the objects we wrote to the remote repository.
Congratulations! You have completed the in-depth walk-through exhibiting standard Git mediated project version control and Git/GitHub interactions!